Tuesday, February 21, 2012

Button stack paper flowers


This is something I saw on pinterest, and the only way i am going to deal with my pinterest obsession is to make every thing I like on there which will surely drive me crazy.

So I saw these cute button flowers... Basically its a paper flower sandwiched by a few colorful buttons, and sewed through, tied off on top.  I started that way and found putting the string through the buttons quite tedious, so I began to cheat. I strung the string through one or two buttons, and glued them on the flower.
I like having another button below because it gives the flower height.
The only thing (I think) I did differently than what I saw was   I gave the pedals a little pinch and then doused them all with a mixture of "Deco art multi purpose sealer" and "gold "Pearl Ex" pigments so they would look less bumpkin... although they still do.. have to do something else to them...hmmm

Tin / metal soda can flowers

Pinterest is driving me insane. I keep finding these wonderful little ideas and they torture me, because I got to retrieve one idea to do it.. and I find 5 more calling out to me just as loud. So, today I decided I would do a few of several ideas.. but for some freaking reason I decided to make these flowers from tin cans, and had to do them first.

Let me say .. these guys look so much better in person, esp that one on the right, and I suspect they will make marvelous fridge magnets because of their fullness.


 I made one from a beer can, and another from a mini diet coke, that is what this can is in the picture.. they are pretty small.
We rarely have cans since we don't really drink soda or beer... but I had the beer can sitting in my house for the past two months ever since I made these awful cheddar cheese soup. The soup was so yucky.. I figure I have to do something with the can.. so here it is.


Using my tin snips (if thats what they are, scissors cut this stuff pretty well too...) I basically cut thriough the pop top opening, and cut off the top. I cut it down the side, and then cut off the bottom. So then you can lay the can flat like the picture. from there you will need a few circles of different sizes. I just freely cut them out... I am not a perfectionist by any stretch of the imagination.

It should look like this one..   


 I punch a tiny hole in the center of each one with my cropodile (you could also use a hammer and nail to punch through). For the larger circle I made a slit in it so I could reach the middle with my cropadile.

Then I cut slits around each circle,some I did more some less, the smallest circle I did about 3.
The slits you make are the beggingings of your pedal, so then you just need to round the tips like how this is started.


I then curled each one a little bit on the sides, and dented it slightly in the middle. They should look a bit like flowers when that is done.


I put a tiny brad (paper clasp) through the smallest and fed the next larger onto that one and so on. Close the brad.,.. and there ya go!


You could spray paint these guys but I love the way you see the advertising. I may make some with my lovely irish oatmeal can next.

Sunday, February 19, 2012

Homemade easy satin flowers w/tutorial


The other day I had the dreadful misfortune of having a frozen laptop. the only way I could think to fix it was to unplug everything and let the battery drain (did not know how to remove it) and had absolutely nothing to look at all day. So, I made these flowers. I think this is something that should be done with ventilation, or outside... just saying... I did mine in the house, closed windows (its freezing) no fan and actually I am feeling much smarter today.. go figure why.

I really enjoyed the process... which of course had to be simple for me to do.

You need: satin ribbon (must be satin) which I picked up dirt cheap at Michaels (2.50 a roll). Scissors, hot glue, and an embellishment if you desire, and a heat gun optional

Here is how... I cut squares off a roll of  satin ribbon  Each square gets a slit in each side, like this
 (I outlined the slit in black so you can see) It is simple, don't let my picture fool you, its a simple cut into each side.


Next you will need a candle, like a small tea candle. You do not want a wax puddle building so, blow it out when you aren't using it.
You will be holding one edge of the ribbon and gently singing the other edges. Do yourself a favor and don't rush and try to do all the edges at once, the satin gets very hot quickly and will burn your fingers as I did several times.
Have something to drop them on too, like a craft sheet or metal sheet. I used a placemat, which was fine until later when I did something regretable :P  Best way is to singe one side, move on to another piece and do a bunch, then go back and do the other sides.  You will see that the ribbon curls slightly making it look like a petal. They may stick slightly, but as they cool and dry you will pop them right off.

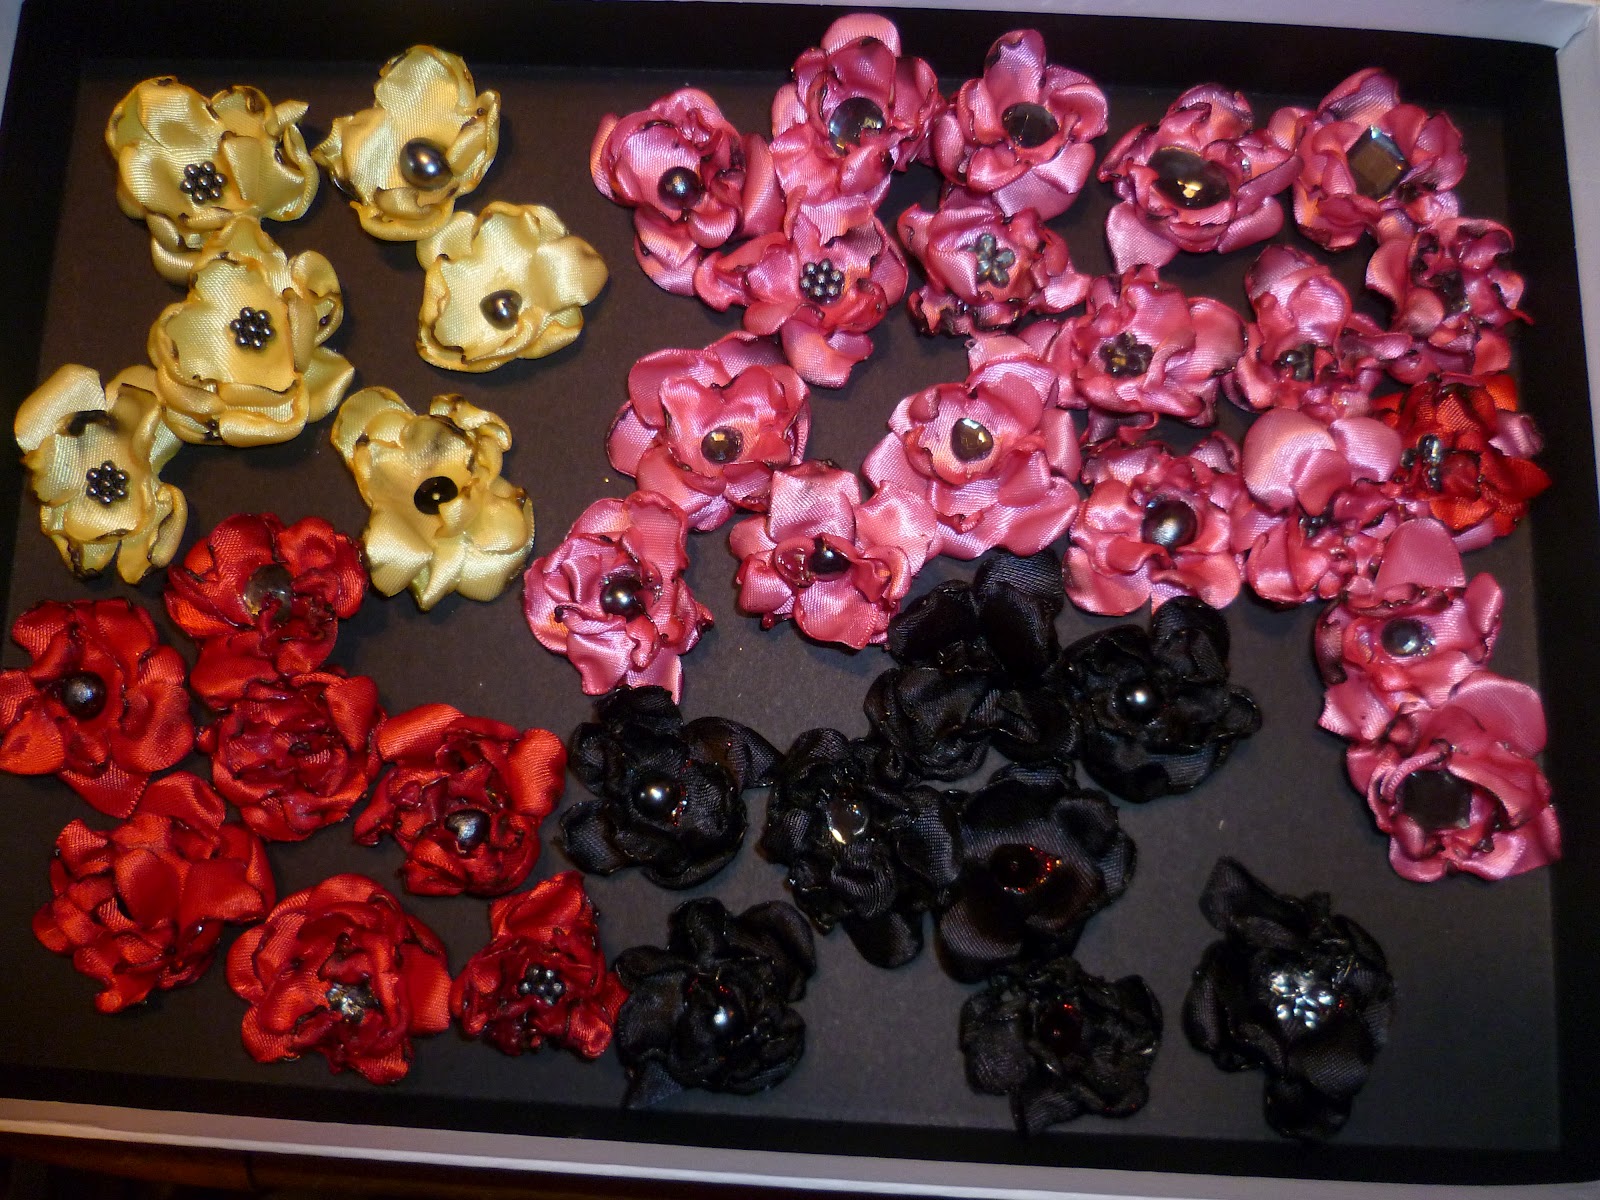
I then would glue 2 together at the center. I found warm (hot) glue was the best way to go. I later added a 3rd and some of them a 4th set of petals.  I added embellishments later using a glue gun again (recollections make a nice little set of flower middles for about 2 bucks)

After they were all done I continued to play with fire, burning off the webs. Brought me back to my ukranian egg dying days :) You could use a hair dryer instead for doing that.

My final thought was brilliant (in a way). I felt the flowers looked to "made' so I took my heat gun and gently heated them from above whilst they sit in a tray. This was great, made them curl in a bit and look nicer. Bad part of that idea was doing it on a plastic placemat... melted the plastic.. but no real harm done, just one ruined placemat. 

So now I have lots of flowers for my never ending projects.. :)  If I was willing to spend 2.50 I would buy some green ribbon and make leaves, I just have a hard time trusting myself in Michaels.

Botanical box I received

I
 just got this botanical matchbox in the mail from Dawna over at Millande, its really pretty. I am still waiting on another one. I have had such bad luck it seems in receiving swaps so I am pleased as peaches this one has arrived!

Simple little book, easy binding!

 
I made this little book the other day after seeing a technique for binding. It took about a minute to make and a tad longer to decorate.
I happen to have a bunch of scrap paper (you know how people have legal size paper they cut down to letter size, I steal their scraps)
I made this book from those scraps, a couple of safety pins and two atc's I had colored the other day with alcohol ink.  The book has about 32 pages.  you can make it by folding the paper in half, and putting a safety pin top and bottom. After you have a few signatures you will feed a ribbon through it. I taped my ribbon to the inside cover.. for a clearer explanation here is a video tutorial.
For a youtube on how... http://www.youtube.com/watch?v=Tm9VXxiyZV8 ...

For decorations I used one of my homemade feathers, it was real easy to re-work it and make it into two small feathers (takes like ten seconds and a wire cutter) Also used the sample off holtz ruler ribbon (I am thrifty) some ball chain (which I now have tons of) a holtz sprocket and another sproket I made myself from shrinky dink, an old key, negative, gems and a milagro.

Thursday, February 9, 2012

Those magnets everyone makes with words

Always wonder why I never see words on them.. so I made some with.
These guys look so much better in person. The marbles are pretty big, from the dollar store. The background is the dollar store mardi gras napkins which look really beautiful on these marbles.. almost a shame to add the words, but really pretty (in person) with the words!

Paper text Feathers, using tissue tape (aka... the easy way!)

The world became a kinder, gentler place (in my head) the day I discovered tissue tape. I never have that many ideas of what to do with it, but its just a wonderful thing. So when I saw the text feathers floating around the internet I thought what better way to make them then to use tissue tape!


You need 3 things: tissue tape, scissors, and jewlery wire wire. I like the jewlery wire cause it bends easy and I have about ten rolls of it, but you can also use that thicker crafty wire if need be.

Simply cut a piece of wire about 3 inches. Cut a small piece of tissue about the size of a dime and wrap it around one end to make the quill. Squeeze it on there, you know how tissue tape can be, you can get it to stay there forever if you just squeeze it good.

Then cut another piece thats about the length of the wire. You will not be covering the quill again, and you want it to pass the end of the wire a wee bit. Lay it on top of the tape like this.


Now cut another strip the same length and carefully line it up with the first piece on the other side of the wire, making a wire sandwich. Press it down all around, emboss the wire with your fingers so it stands out. Don't worry so much if your wire moves because feathers often have wider barbs on one side than the other.

Now cut a large curve on the bottom, and taper it up to a point to the top of the wire to make it look like a feather.

From here its just cutting. You will make tiny slits starting at the base. the scissor should be pointed downwards. the best thing is that you can easily cut without fear of going all the way through, thanks to the wire. Cut tiny slits all the way around, be very careful around the top, remembering that you want the barbs to face upwards when complete. I like to give the feather a twist when its done so it bends to one side (looks more natural) and ruffle the barbs. Hope you like it!